Cabin Demonstration
| Step
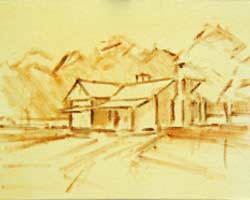
One. My initial sketch, done with a small bristle brush, immediately establishes the design using a minimal amount of relatively dry brushwork. I try to avoid using too much paint at this stage so that I can easily alter the composition. I focus on placing the center of interest in a well-balanced arrangement of shapes. The canvas has been toned in a light golden hue that will keep the center of interest, the rustic cabin, glowing and fresh. The toned canvas also establishes a warm dominant mood that will make it simpler to suggest the light effect that I have in mind. Burnt Sienna is used to create the sketch and lightly shade in the darker areas. |
 |
| Step Two. As I continue to pull the composition together, refine the main shapes and add some smaller, subordinate shapes, I spend additional time developing a cohesive value pattern. My aim is to create a simple but arresting pattern of lights and darks that simultaneously suggests the source of light on the subject and adds presence to the center of interest. | 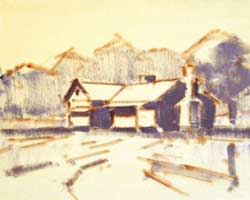 |
| Step Three. The major shapes are then massed in quite simply with a large (#8) brush using colors that will approximate the finished painting. In this step, I am most concerned with establishing the colors that will carry the composition and create an interesting variety of hue, temperature, intensity, and value. | 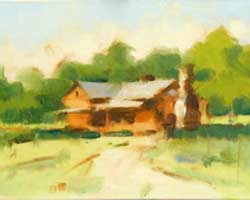 |
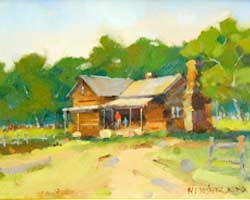
Step Four. I complete the painting by applying thicker paint, using the largest brush possible to avoid over-painting and to keep the brushwork spontaneous. Final adjustments to values, shapes and colors are made with a few decisive and carefully-placed brushstrokes, paying special attention at this stage to creating a variety of lost-and-found edges. I introduce calligraphy using a rigger or #1 bristle brush to suggest detail, provide a greater variety of shapes and color, and add interest to the composition. |
"Stone Mountain Sanctuary" |